
 1969
1969
To get familiar with Noisy’s layout, we will start off with a subtractive synthesis approach as known from a lot of (virtual) analog synths and expand from there.
-
open an init preset
Open the main menu and choose “new preset”. Click on the layer 1 page in the Navigation Bar to display its modules.
-
find the noise gain module

The Noise Gain module is the origin of all sound coming from Noisy. When you hit a key, you will hear a short sound and see a small dot jumping around the Noise Gain knob, indicating that the source signal is triggered.
-
dial in attack and decay in the expression module

In order to manipulate its volume over time when a note is played, you would use an amp envelope. You can get this from the purple Expression module on the top left. Within the Expression module, set the Attack, the Decay, the Envelope amplitude and how this amplitude depends on the note velocity to your liking.
-
dial in sustain with the noise gain knob
The position of the Noise Gain knob indicates the volume level that the envelope starts with and to which it falls back when the envelope has run through all its stages. In other words, it behaves like the sustain section of a classic ADSR envelope. Set the Noise Gain to 0 for key or plucked sounds, or to higher values for sustained, pad-like sounds.
-
how expression affects noise gain via its modulation tab
If you follow the purple color coding of the Expression module and have a look at the Noise Gain module afterwards, you will see a purple border around the knob. It indicates the range of parameter manipulation applied by the Expression module.

You can increase, decrease or even invert this range by tweaking the Expression amount knob inside the Modulation panel of the Noise Gain module. If you dial back the Expression amount to zero, it would mean that the parameters you had set inside the Expression module during step 3 cease to have an effect on the Noise gain.
-
the resonator: morphing through different waveforms
Now, let’s have a look at the bottom half of Noisy’s interface. Noise essentially is pure sound chaos by its nature. It contains highly dynamic sound energy at all frequencies of the spectrum. It is the Resonator that generates actual musical signals with a perceivable pitch from this.
To achieve this, it uses very narrow bandpass filters to strongly amplify a selection of frequencies within all the sound chaos. Stacking those amplified frequencies in certain ratios upon each other leads to a musical signal, and can be used to recreate all the waveforms that you already know from more traditional synths, all while maintaining a certain organic and evolving character.
Luckily, you don’t have to worry about all the technical details. Just move the dot in the matrix to crossfade between different waveforms. As the grey lines in the background suggest, having the dot at the top leads to a signal with few overtones, whereas having it closer to the bottom allows you to morph through different waveforms with richer harmonic content.

-
dial in release time with the oscillator resonance

If you want your sound to decay slower after letting go of a note, you can do this by increasing the oscillator resonance. Doing so will make the Resonator resonate longer. This is comparable to increasing the release on a classic ADSR envelope.
-
mix in resonator 2 and 3
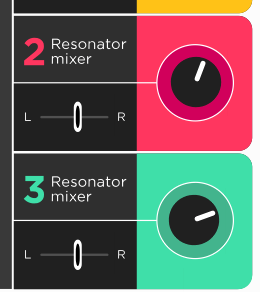
You can now start stacking more waveforms. Use the other two resonator matrices to expand your sound. This is the equivalent to adding oscillators in a classic subtractive synth workflow. To hear the signal of Resonator 2 and 3, you will need to raise their volume in the Mixer module. Once again, follow the color coding to easily identify the yellow, red and blue levels of the resonators.
-
detune resonators 2 and 3 or add an interval offset
Below the second and third Resonator you will find a Harmonizer panel. These panels will allow you to add octave offsets or slightly detune the Resonator’s sound in relation to the first Resonator, resulting in a fuller sound.
-
the matrix’ modulation panels

Now, let’s bring some movement into our sound. Within the Resonator modules, you will find Modulation panels similar to what we have seen in the Noise Gain module. Such Modulation panels provide the envelope from the Expression module and an LFO signal as modulation sources for the parameters they are paired with. In case of the matrix, there is one for the x axis and one for the y axis, allowing you to automate crossfades between waveforms.
-
automate waveform morphing with the lfo

This time, we will use the LFO signal to induce a movement of the dot inside the matrix, leading to automated morphing of the resonator’s waveform. When tweaking the LFO range, a blue border around the knob gives you the hint to look out for the blue module when you want to adjust the LFO signal itself.
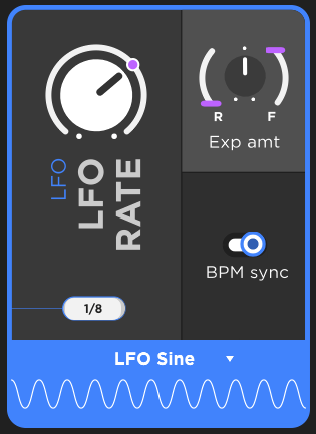
The blue LFO module is located right next to the Expression module. You can change its waveform and frequency and also sync it to your host tempo. You can use the LFO to modulate any module that features an LFO range knob.
-
use the dedicated vibrato lfo
Often, you would have the LFO control the pitch to induce vibrato. To have this common scenario separated from the main LFO module, we have integrated a dedicated LFO. You will find it below the first Resonator. The vibrato LFO’s waveform is a sine and you can adjust its rate and intensity.

-
add the lowpass filter to your signal chain
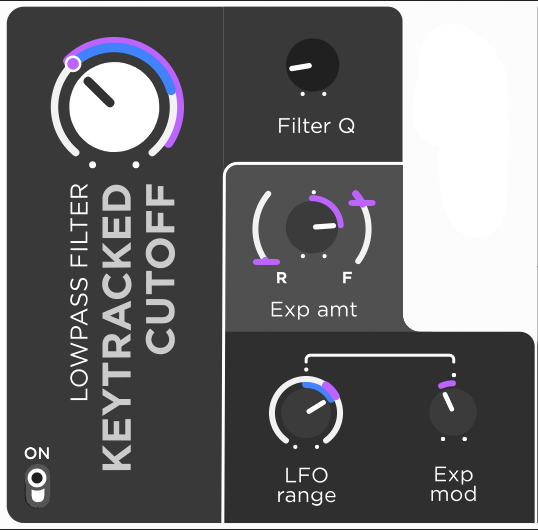
You can’t talk about subtractive synthesis workflows without talking about filters. In the case of Noisy, we provide a key tracked low pass filter. Use the Lowpass module situated behind the three resonators’ outputs to shape and filter out frequencies. The Filter module is activated or deactivated with a little switch on its bottom left corner.
-
modulate the filter cutoff with the expression envelope
Of course, the Filter module has a Modulation panel as well. We will use the Expression envelope as a modulation signal that opens the filter. This allows adding a nice shape to the sound.

With this set up, it also becomes obvious how you could use the Velocity knob inside the Expression module to make your sound become brighter when playing with a higher note velocity. If you set velocity to the max, the more intense you push down the keys, the higher the amplitude of the expression signal, and the higher the effect it has on the filter cutoff.
-
thicken the sound with the soft clipper
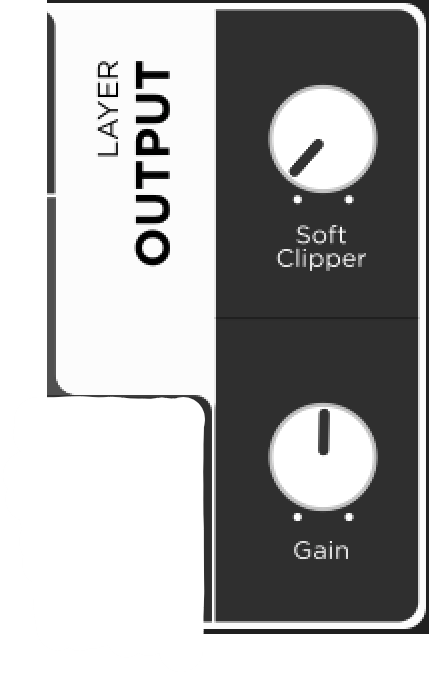
If you wish, you could add some mild distortion and warmth with the Soft Clipper in the Layer Output module. Use the layer volume to balance out the increased level in this case.
-
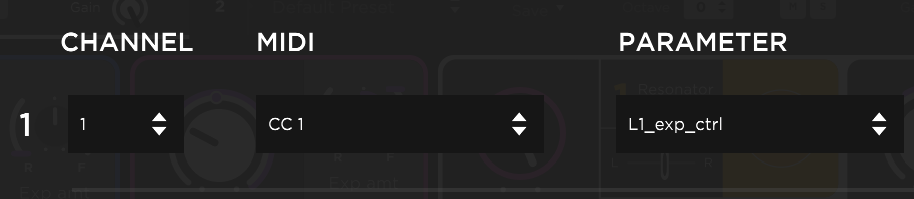
map the expressive control

It’s now time to finally dig into what makes Noisy special on the “expressive” side of things. Until now, we used the Expression module as a mere envelope. This envelope was only dynamic or expressive in the sense that you could use the key velocity to change its intensity. The main idea behind the expressive control knob and all the modulation panels referring to it, is however that you could use this knob in real time to modulate several parameters at the same time. You’ll hear the changes to your timbre when turning the knob with your cursor.
It’s even more satisfying when you map the knob to some hardware control. For this, go to the burger menu in the upper right corner and open the MIDI mapping table. The expression control of layer 1 should already be listed in the first line. Choose your mod wheel (CC#1) or aftertouch (if your keyboard supports it) as a control source. Play some notes and move your modwheel and you will notice how naturally the sound unfolds and comes to life.
-
save your custom layer preset
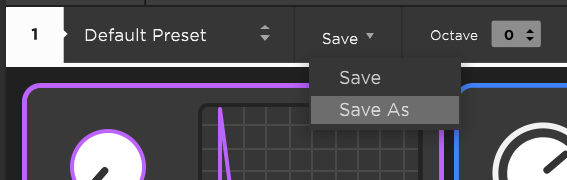
We have now created a basic sound within one of the two layers of Noisy. We followed a subtractive synth workflow and made sure we have some additional control over it via the Expression module. Let’s save this layer preset by clicking on Save As within the layer’s navigation bar and enter a name. This way, you could combine the newly created layer preset with any other layer preset.
-
move on to layer 2
We will now move on to the layer 2 page. Click on the 2 in the navigation bar and you will see that layer 2 offers the exact same functionality as layer 1.
In order to only hear the second layer, we will mute the first layer by clicking on the M button.
-
make layer 2 audible
For the moment, you won’t hear anything, since the envelope’s amplitude is still set to zero for the second layer. Turn up the envelope knob and the noise gain will be triggered.
-
use the resonators comb filter
We have seen that the resonators of Noisy can be used to generate all classic waveforms. Their specialty however is the integrated comb filter. Excited by the noise signal it produces a sound that is resonating in a bodily sense, as if you would strike a corded instrument. It’s a technology that is used for physical modelling as well.
To hear what I refer to, move the slider of the resonator all the way to the bottom. This slider allows to crossfade between the matrix resonance oscillator and the comb filter output. For the moment, all you hear is noise when having the slider at 100% comb. In order to let this noise excite the comb filters, you need to turn the Comb resonance either clockwise or anti-clockwise. Turning towards the + symbol will result in even harmonics added, whereas turning it towards the - symbol will add odd harmonics. With little amounts, the signal remains rather noisy. When using bigger amounts of Comb resonance the signal will have a clearer perceivable pitch and will also resonate longer. It adds to the unique touch of the comb filter that its sound decays in a natural way, as if it was an acoustic instrument that you are hearing.

Please note that the Resonator matrix has no effect on the Comb Filter section’s sound at all.
-
listen to the effect of different noise types
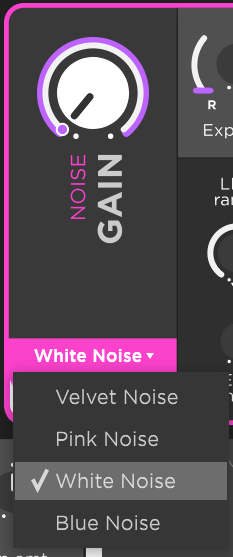
While checking out the resonances we can create with the comb filter, it is also exciting (pun intended) to listen to how different noise types will affect the outcome. Click on the dropdown menu in the Noise Gain module and switch through the different noise types.
Please note that different types of noise will also change the character of the matrix oscillators. Shift the crossfade slider up again and listen to the grainy character that pink noise will give to a matrix oscillator, just to name an example.
-
finish your layer 2 sound and combine it with layer 1
You can now add the fifth and sixth resonator to your sound. Just raise their volumes in the mixer as mentioned in step 8, Feel free to experiment with adding other types of comb filter sounds and crossfading between the matrix oscillators and the comb filters. Along the process, unmute layer 1 again in order to hear how the second layer’s sound works together with it.
-
map expression control of layer 2 to your hardware
If you want, follow the same instructions as in step 16 to find a way to control the Expression macro of Layer 2 from your hardware controller. The parameter you need to map in the MIDI mapping table is called L2_exp_ctrl. It is available in the table’s second line by default. Once done, play with both Expression macros from your hardware controller and see how it can morph your sound in real time.
-
polish the sound with reverb and delay
Click on FX in the navigation bar to open the effects page. The effects are applied to the summed signal of layer 1 and 2.
-
add expressive effects

Choose one of the effect algorithms for the first effect slot and use the two white knobs inside the slot to adjust the parameters to your liking. Choose another algorithm for the second slot and do the same.
-
setup the fx expressive controls
By default, the two parameters of the first effect slot receive their modulation signal from the red FX expressive control macro, while the two parameters of the second effect slot receive modulation from the green FX expressive control macro. You can switch between using FX macro 1 or 2 for a parameter by clicking below the exp. amount knob.
Turn all the exp amount knobs slightly to the right, so that the parameter is increased when the red and the green macros are moved.

Find a good minimum and maximum setting by playing and tweaking the red and green macros at the same time with your mouse. Using the MIDI mapping table, you could also assign a hardware control element to the two FX macros.

-
save your entire sound
You have now set up a sound with four dimensions that you can easily automate from your DAW for an evolving, non-static sound: The Expression controls on Layer 1 and Layer 2 allow you to manipulate the synth engine itself and the two FX macros on the FX page can infuse additional sound changes with the simple turn of two knobs.
When you are happy with your creation, use the ‘SAVE’ option in the title bar to keep the preset safe for the future.

