 8043
8043
This article explains how to set up Touché or Touché SE to work within PreSonus Studio One 4 and 5.
Scanning Lié inside Studio One
Studio One scans its plug-in database on every launch. In macOS, Studio One will scan the default folder for VST plug-ins and AU components, which contain Lié in both versions.
In Windows, our Lié installer will place Lie.dll (the plug-in file in VST2 format) in C:\Program Files\Vstplugins by default. If you haven't adapted this path, please confirm that the folder is added in the Plug-in Locations of Studio One:
Options -> Locations -> VST Plug-Ins
Alternatively, with Windows Explorer, you could manually move the Lie.dll to a folder that is already listed in Studio One.
Enabling MIDI Input from Touché (SE)
- Go to Options -> External Devices.
- Click on 'Add...'.
- Choose 'New Keyboard'.
- In the 'Receive From' field, choose 'TOUCHE' for a PC, or 'Touché Main Port' on a Mac.
- If you want, you can enter a Device Name.
- Hit 'OK'.

Note: Please do not use MIDIIN2 (TOUCHE) on your PC at all. The same goes for 'Touché Control Port' on your Mac. These ports need to be free in order for the recognition system between Lié and Touché to work.
Loading Lié in a track
- In the browser on the right-hand side, choose 'Instruments'
- Search for Lié. It is listed under manufacturer 'Expressive'.
- Drag & drop Lié in your project. A new Instrument Track will be created.
- Make sure that the Instrument Track receives MIDI from all your MIDI devices ('All Inputs')

- Double-click on a preset in Lié's browser.
- You can now play notes on your keyboard and change the sound with Touché (SE).

Accessing automations recorded with Touché (SE)
The controller data coming from Touché (SE) and controlling the parameters in Lié will always be written inside an Instrument Part (or Instrument Pattern).
Here is how to access the automation lanes:
- Double-click on the Instrument Part that you recorded.
- The Editor will open in the lower part of the screen.
- Click on the small 'Show Automation Lanes' button underneath the Piano Roll.
- Add automation lanes by clicking on the '+' icon.
- Lanes that already have data written into it are easily selectable via buttons at the top of each lane. Touché's axes will be available as:
- General Purpose 1
- General Purpose 2
- General Purpose 3
- General Purpose 4

Mapping parameters without Lié
Mapping directly with Studio One's Control Link
In order to control other parameters than those of VST instruments hosted inside Lié, you could still use Touché (SE) as a MIDI class compliant controller in Studio One.
Attention: When you follow the instruction below and map Touché's axes with Control Link, then the MIDI CC coming from Touché won't get through to Lié anymore. They will be blocked until you delete their mapping via Control Link again. This means you can either use Lié or Control Link in a project, not both at the same time.
For a detailed explanation of the Control Link feature, please read the Control Link chapter in Studio One Reference Manual.

Setting up Touché (SE)'s axes as hardware controls for Control Link
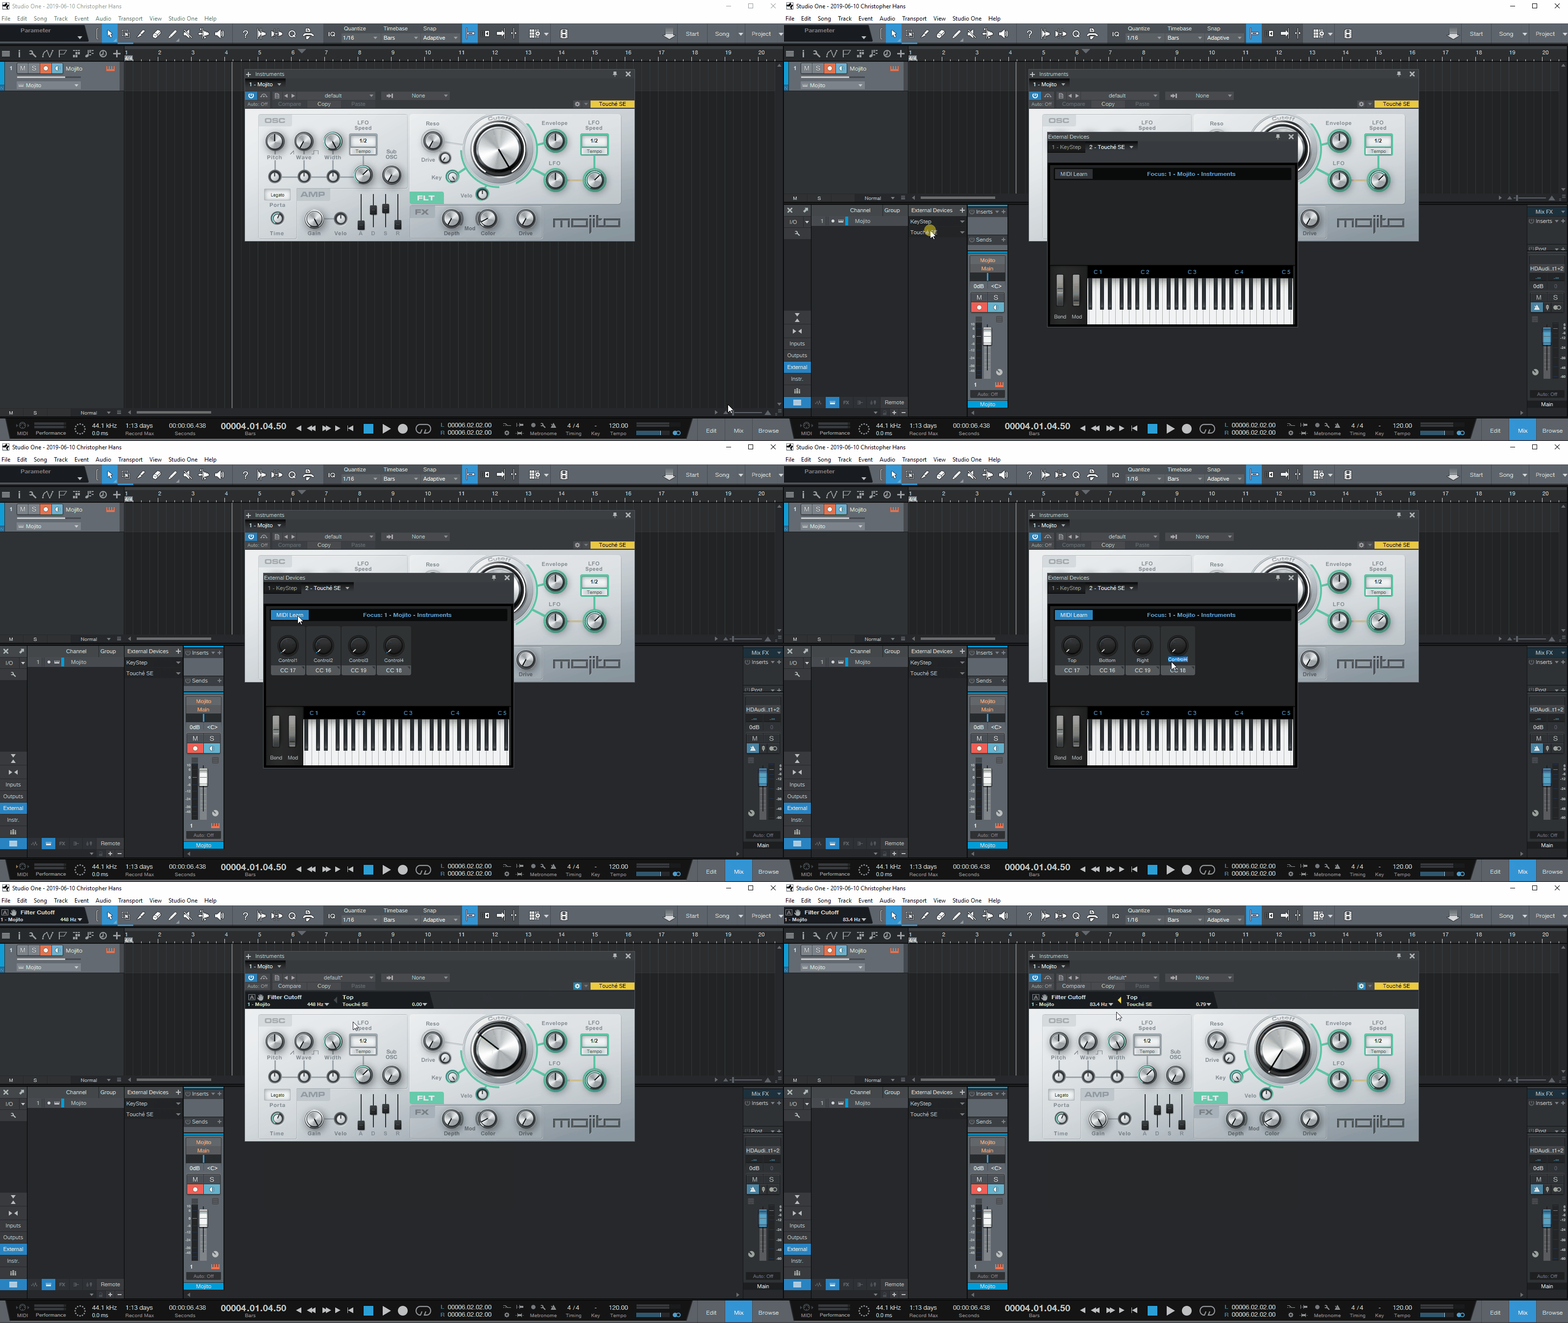
- Open the Mix view and find Touché (SE) entry listed under 'External Devices'. Double-click on it. It might be that you have to show External devices via highlighting the 'External' button on the far left in the Mixer first.
- It will open the Device Control Map. Click on MIDI Learn, so Studio One can learn all possible data being sent by Touché (SE).
- Push on Touché (SE)'s touch-plate until all four axes are recognized. Studio One will create four virtual knobs representing the four axes. Their order will probably be random, since the mechanism is very sensitive.
- For later convenience, we recommended to rename the knobs according to their dimension on Touché:
- CC16 -> Bottom
- CC17 -> Top
- CC18 -> Left
- CC19 -> Right
From now on, you will be able to use the Control Link function with Touché (SE). It is available in the general toolbar of Studio One in the left, or individually when opening the GUI of an instrument and clicking on the gear icon in the top right.
Linking a parameter to an axis of Touché (SE)
- Move the parameter that you want to control with an axis on Touché. It will be displayed as the latest edited parameter in the Control Link's left section.
- Move the axis on Touché that you want to link to the parameter. It will be displayed as the latest touched hardware control in the Control Link's right section.
- Click on the triangle between the left and right Control Link section to create the Link.


