
 14633
14633
This article explains how to set up Osmose within Apple Logic Pro X. The first chapter deals with using Osmose as an MPE controller, and the second chapter shows how to integrate it as an external instrument, recording performances as MIDI messages and playing them back into Osmose's EaganMatrix. There's also a video tutorial (French with English subtitles) available here: 🎞️use osmose with logic pro - creative tutorial.
Using Osmose as an MPE controller in Logic Pro X
When controlling external instruments inside your DAW, use USB MIDI Port 1 (Play port) of Osmose exclusively, see: Connect Osmose to your computer.
Choose MPE configuration for Osmose's External MIDI Mode
On Osmose, enter the config menu of External MIDI mode and select the "mpe" configuration.
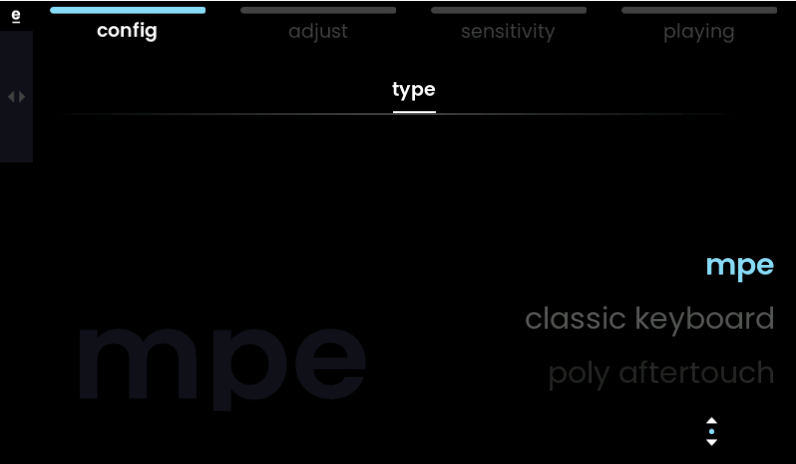
This will make Osmose send MIDI messages according to the MPE specification on Port 1.
Enabling MIDI input from Osmose in your DAW and disabling MIDI data reduction
In Logic Pro X, you can check both inputs in Logic Pro's settings -> MIDI -> inputs, although we'll only use Port 1 when using Osmose as an MPE controller for your plugins. You can still filter which input to use for a track with the Track Inspector.

In your Project Settings -> Recording -> MIDI, disable the MIDI data reduction:

Creating an instrument track with Osmose as the input device
In Logic, create a new Software Instrument track: “Track” menu > “New Tracks...”. Then select “Software Instrument” and click “Create”.

In the Track Inspector of the channel, make sure only to select "Osmose Port 1" for the 'MIDI In Port', not "All".

Configure MPE interpretation in the plugin
Be aware that for some MPE-compatible plugins, MPE functionality must also be activated from within the plugin. Check your plugin’s manual to learn about its MPE workflow. When MPE is activated in the plugin, 'Pressure' will be controlled by Osmose Initial Pressure axis and 'CC74 (MPE Timbre/Slide)' is controlled by Osmose's Aftertouch axis. For more details, see config menu.
Some factory plugins from Logic Pro X (Retro Synth, ES2...) support Midi Mono Mode, a variant of MIDI quite similar to MPE. It can be activated in the footer of the plugin window: Midi Mono Mode: "On (with common base channel 1)".

In most MPE synths, the maximum MPE note pitch bend range (Axe X) is set to +-48 semitones by default. Adjust the ‘bending range’ fraction on Osmose (Ext Midi mode > sensitivity menu > bending tab) for a more playable range. Example: When the maximum pitch bend range in your external synth is set to 48 semitones, set the fraction in Osmose to 1/48 to end up with a +/-1 semitone range for note bend gestures.
Integrating Osmose as an external instrument in Logic Pro X
When you plan to record performances on your Osmose as MIDI messages inside your DAW and play them back into Osmose, use USB MIDI Port 2 (Haken port) of Osmose exclusively, see: Connect Osmose to your computer.
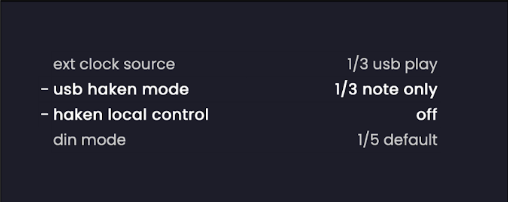
Select the suiting midi i/o settings on Osmose for integration into a DAW setup
Head to Osmose's midi i/o tab. Set 'usb haken mode' to "1/3 note only" to ensure Osmose sends MPE+ messages on Port 2. Set 'haken local control' to "off" to route your playing through your DAW before triggering the instrument. Attention: With 'haken local control' set to "off", Osmose will only sound when its track in your DAW is armed.
It's the classic workflow of listening to your performance ‘as recorded on tape’ instead of monitoring the source directly. It will make sure that your performance sounds identical during recording and playback.
Enabling MPE+ input from Osmose and MPE+ output to Osmose in your DAW, and disabling MIDI data reduction
In Logic Pro X, you can check both inputs in Logic Pro settings -> MIDI -> inputs, although we'll only use Port 2 when integrating Osmose as an external hardware instrument. You can still filter which input to use for a track with the Track Inspector.
In your Project Settings -> Recording -> MIDI, disable the MIDI data reduction:
Creating a MIDI track with Osmose as input and output device
In Logic, create a new External MIDI track with an External Instrument plug-in loaded onto it: “Track” menu -> “New Tracks...”. Then select “External MIDI” with "Osmose Port 2 - All" as 'MIDI Destination'. Activate "Use External Instrument plug-in" and set the 'Audio Input' so it matches the one your Osmose audio output is connected to. Click “Create”.

Then, in Track Inspector, change the 'MIDI In Port' from "All" to "Osmose Port 2"

Arm the MIDI track, and you are ready to record, edit, and playback Osmose performances in Logic Pro X.

