
 5570
5570
The Synth menu allows you to adjust the sound of each selected preset individually. It also lets you change the behavior of the sliders and pedals for that sound. It contains the following tabs:
macros tab : tweak predefined macros for subtle to drastic changes to the sound of the preset
global fx tab : select the preset’s global reverb or delay effect and adjust its parameters
eq tab : access a shelving equalizer to change the frequency balance between lows and highs
comp & drive tab : select and configure the compressor or the drive output stage
voice tab : set the pitch slider range
assign tab : define the parameters controlled by the modulation slider and the pedals.
ℹ If you wish to save the changes you have made, use the save tab inside the presets menu.
macros tab
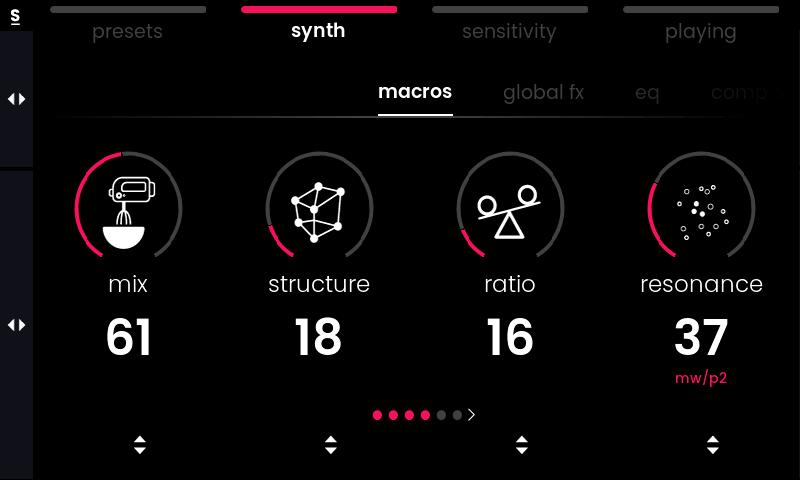
The first tab in the synth menu gives access to up to 6 sound macros that are predefined by the sound designers during preset creation. A single macro can modulate multiple parameters in Osmose’s modular sound engine at once, allowing for subtle to drastic changes to the sound of a preset.
The choice of macros offered will be different depending on the preset type. It may include envelope times, cutoff values, FM ratios, etc. Presets that share the same type and character tag will have similar macros to play with. Find below some examples of basic macros you will come across often:
analog-style and fm sounds
timbre changes the tone of the sound source, adding more or fewer harmonics.
fmAmt is the amount of FM synthesis applied to the sound, generating complex timbres by modulating the frequency of one sound source with another.
fmRatio changes the FM ratio, the overtones/harmonics relations impacting the timbre of the sound.
cutoff is a filter control for attenuating high or low frequencies of the sound.
envAmt is the amount of envelope applied to the sound when you press the key; it is a form of automation that is triggered by the velocity of your gesture and added on top of the continuous gesture control.
envTime is the time length of the envelope applied to the sound. You can, for instance, morph from a very long pad with a lot of release to a short, brassy sound.
modulation is a cyclic and automatic variation applied to the whole timbre of the sound.
physical modeling, acoustic-type sounds
structure changes the harmonics of the sound by controlling the ratio between partials. Depending on the preset, it can morph the sound from a plucked string to something reminiscent of a marimba, a vibraphone…
body modified the tone by crossfading between different eq (convolutions) of instruments and material. For instance, it could morph a woody bamboo flute into something that sounds rather metallic.
resonance changes the decay/release of the sound, from short to long. Low values can sound like dampening or muting the vibration of a string or beam. Not to be confused with filter resonance.
global fx tab

The ‘global fx’ tab allows creating of a sense of space by adding a global time-based effect to the sound. The first parameter selects one of seven reverb/delay/echo algorithms. The FX parameters will vary depending on the effect chosen. One parameter is always available:
mix controls the dry/wet of the FX, the amount of sound that passes through the FX.
The effect algorithms available and their dedicated parameters are:
short reverb / long reverb
Two types of digital reverberation effects that can go from small rooms to huge ambient spaces.
predelay sets the time before the reverberated sound starts. It avoids the initial attack of your sound being masked by the blurriness of the reverb effect.
diffuse is rather subtle. Depending on the decay time, different diffuse times can make the decay sound smoother or, if wanted, more metallic (ringing). It helps to fine-tune the reverb sound for a maximum quality output.
LPF and HPF let you filter the highest and lowest frequencies from the reverberated sound. The Low Pass Filter removes highs, the High Pass Filter removes the low end.
damping reduces high-frequency content with each feedback loop in the reverb. The sound gets duller over time.
decay is the amount of decay/reverb time
mod delay / swept echo
‘mod delay’ is a modulated delay for chorus and vibrato-like effect. It can sound really atmospheric, creating a very smooth modulated reverb-like sound, but at the expense of obvious early reflections and a pitch tail in the echoes that sweeps a bit.
The ‘swept echo’ is another flavor of a delay with modulations. It can achieve more of a flanger-like effect with huge stereo movements.
depth is the amount of modulation in the delay
date is the rate of the modulation in the delay
feedback is the amount of delay feedback
time is the delay time
analog echo
A delay with a more analog-like response. Like vintage echo effects, you can push the feedback to loud oscillations and play with time for crazy SFX.
noise is being added to the delay.
offset is a reverb timing offset between left and right channels (left channel time is the same as right channel time if the offset is 0 but is less when the offset is increased; this effect is not a linear timescale but can be noticeable/useful in some situations.)
feedback is the amount of delay feedback
⚠️ Analog echo can produce very loud feedback when this parameter is increased above a value of 70. Be ready to lower the volume when experimenting with this effect.
time is the delay time
lpf echo / hpf echo
A clean digital echo with a low or high pass filter for a more focused separation of the delay from the sound source.
LPF or HPF : when LPF is set to zero, it is similar to full damping, and when HPF is set to max, it is like full damping. The LPF and HPF are applied at the very end of the effect signal chain, not inserted in the delay chain. It means the echo is echoing the unfiltered signal internally, and the filtering happens only at the output.
offset is a reverb timing offset between left and right channel (left channel time is the same as left channel time if the offset is 0 but is less when the offset is increased; this effect is not a linear time scale but can be noticeable/useful in some situations).
feedback is the amount of delay feedback
time is the delay time
💡If you still have a delay-like effect on your sound even with the mix at 0, then a delay-like effect might be programmed directly inside the EaganMatrix to add even more ambiance. A macro (often the 6th) in macros tab should allow you to change the delay time or to remove it entirely.
In the Haken Editor, global fx are called “Recirculator”. Effects parameters are also accessible as a modulation destination to add even more variation with LFOs etc.
eq tab
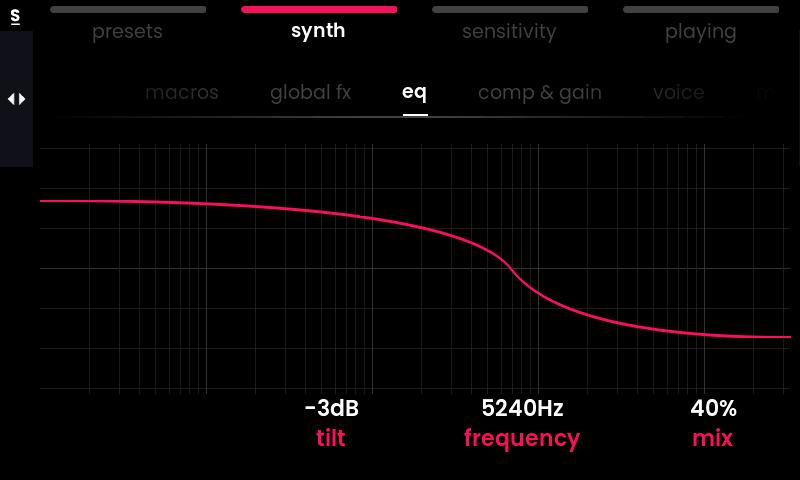
The ‘eq’ tab lets you balance the frequency components of a preset, shaping the sound either subtly or drastically “brighter” or “darker”.
It is a general tilt equalizer based on a stereo pair of shelving filters with separately controllable low and high frequency components in the range of 120Hz to 15KHz.
The following parameters are adjustable:
tilt : Positive values will lead to more highs and fewer lows, negative values will boost lows while highs are attenuated (low and high being relative to the central frequency)
frequency : choice of the central frequency that defines the threshold between lows and highs
mix : dry/wet of the Tilt EQ, allowing parallel equalizing. The equalizer won’t have any effect when the mix is set to 0%.
comp & drive tab
The comp & drive tab lets you choose between two different output stages to round off a sound.

compressor
Osmose’s sound engine EaganMatrix is a complex, modular synthesizer. Therefore, modulations to the volume happen at numerous stages in sound design which leads to a possibly huge dynamic range.
The compressor output stage allows you to handle the level and tame the dynamics of a preset with gain staging and a compressor. At the same time, you can use the compressor’s pregain parameter to add an aggressive distortion to the audio that is reminiscent of a wave folding effect.
pregain sets the level that enters the compressor.
comp. amt is a one-knob control for a light compressor that can keep levels more consistent.*
comp. mix allows mixing the wet and dry signal of the compressor to achieve parallel compression.
postgain changes the overall volume of the sound. Used to manually normalize a preset’s loudness or compensate for too high volume induced by the distortion effect created with the pregain.
* The compression amount is a macro parameter that controls 3 compressor parameters inside the EaganMatrix at once:
Tweaking the comp. amt from 0 to 127 results in changing the threshold from 127 to 0, the attack from 127 to 0, and the ratio from 0 to 127.
drive
The ‘drive’ output stage serves as a warmer sounding alternative to the regular distortion offered by the ‘compressor’ output stage. It uses a technique called tan-h saturation to achieve a type of distortion that is more reminiscent of a valve overdrive.
pregain sets the level that enters the drive stage.
drive amt defines the intensity of the drive saturation effect.
drive mix allows mixing the wet and dry signal of the drive stage to achieve parallel distortion.
postgain changes the overall volume of the sound. Used to manually normalize a preset’s loudness or compensate for too high volume induced by the saturation effect created with the pregain.
voice tab

The ‘voice’ tab features only one parameter: the pitch bend range of the pitch slider. Contrarily to note bending on the keys, the slider will affect all played notes as a whole, just like a regular pitch wheel or touch strip would do.
mod/pedal tab
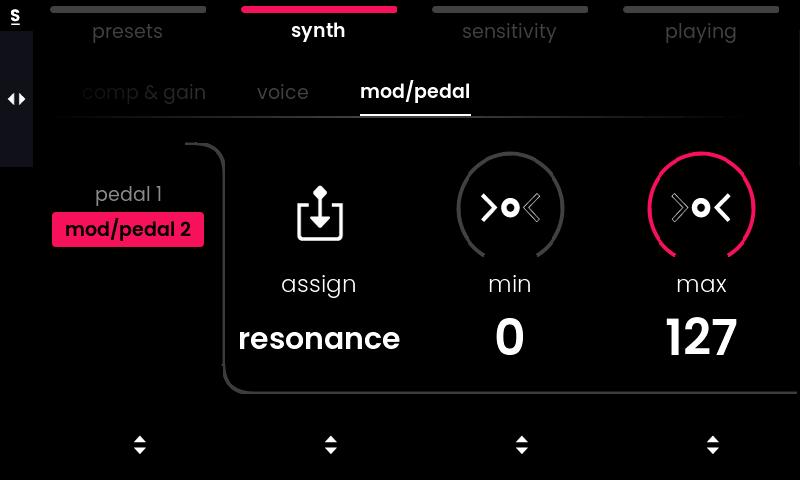
The ‘mod/pedal’ tab lets you choose the parameters that you control from the modulation slider and the two pedal inputs. These are always global parameters that will influence the sound as a whole, not on a per-note basis.
☝️ Not all pedals are supported, and you need to make sure to calibrate your pedals via the global settings before using them.
The first parameter allows you to select one of the two sources of modulation:
Pedal 1 is assigned to Sustain by default. Pedal 2 and the Mod Slider will always control the same parameter and are assigned to one of the sound macros by default.
For each of those two controller sources, you can modify:
assign for selecting the modulation targets like different types of sustain, the synth macros, the effects parameters, and the post gain. For instance, mapping your pedal to the post gain will make it act like a classic volume pedal.
min sets the minimum value controlled
max sets the maximum value controlled
ℹ The sustain and sostenuto functions in Osmose work differently compared with regular keyboard instruments. Usually, sustain takes the current pressure/position of the notes played and keeps them in that state. On Osmose, Sustain, and Sostenuto are continuous controls that allow fading and swelling sustained notes when moving the expression pedal. See also: pedal compatibility and recommendations.
ℹℹ Sostenuto will only sustain notes that were held at the moment you pressed the Sostenuto pedal. It lets you hold one or several "drone" notes with your pedal and then lets you use both hands to play another part without any sustain on top. If you assign the two pedals to sostenuto 1 and sostenuto 2, respectively, you can hold and fade two sets of sostenuto notes at the same time.

