 8127
8127
This article explains how to set up Osmose within Steinberg Cubase 14. The first chapter deals with using Osmose as an MPE controller, and the second chapter shows how to integrate it as an external instrument, recording performances as MIDI messages and playing them back into Osmose's EaganMatrix.
Using Osmose as an MPE controller in Cubase
The required configuration for some Expressive Suite products differs from the default setup described below. For using Phase Plant Expressive Suite inside Cubase, please refer to this dedicated article. For using The Legend HZ & Dune 3 Expressive Suite inside Cubase, read here.
When controlling external instruments inside your DAW, use USB MIDI Port 1 (Play port) of Osmose exclusively, see: Connect Osmose to your computer. On your Windows PC, Port 1 will simply be called "Osmose". Take this into account for all the following instructions:
Choose MPE configuration for Osmose's External MIDI Mode
On Osmose, enter the config menu of External MIDI mode and select the "mpe" configuration.
This will make Osmose send MIDI messages according to the MPE specification on Port 1.
Enabling MPE input from Osmose in your DAW
Cubase uses its own "Note Expression" system that predates MPE. In newer versions, Cubase will automatically add two Note Expression Input Devices, one for each of Osmose's USB MIDI ports, to its Studio Setup whenever you connect Osmose to your computer. You can double-check this via the menu Studio -> Studio Setup. For controlling plugins, only Osmose's USB MIDI Port 1 is relevant (selected in the screenshot below).
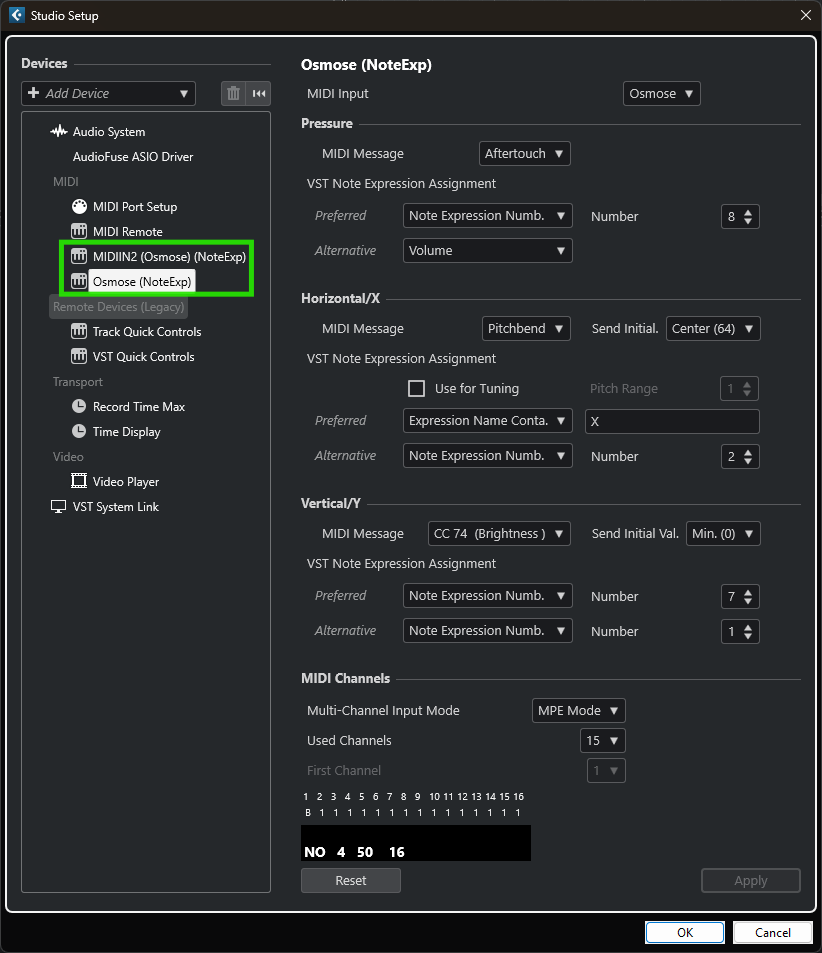
If you are on a Windows PC, but the devices don't show up, then it can help to temporarily activate "Use Device 'WinRT MIDI'" in the MIDI Port Setup. You can deactivate the option right afterward, but the Osmose Note Expression devices should still remain added.
On older Cubase versions, you will need to create the Note Expression Input Device manually by clicking on “Add Device” > “Note Expression Input Device”.

For the newly created Note Expression Input Device, set Osmose Port 1 as 'MIDI Input'. The rest of the settings should be matched with the screenshot further above.
Creating an instrument track with Osmose as the input device
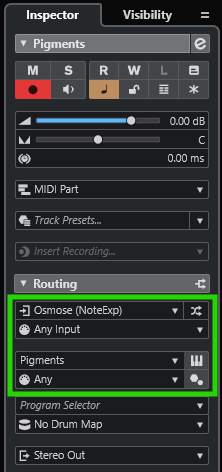
Create a new Instrument track: “Project” menu > “Add Track” > “Instrument” and select an MPE-compatible instrument plugin. In the Track Inspector, select “Osmose (NoteExp)” for the track's MIDI input and the MIDI channel selection to "Any".
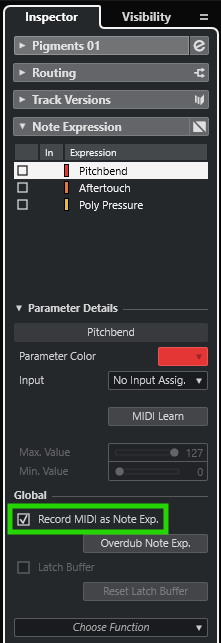
Further down in the Inspector, in the section 'Note Expression', activate 'Record MIDI as Note Exp.'
Configure MPE interpretation in the plugin
Be aware that for some MPE-compatible plugins, MPE functionality must also be activated from within the plugin. Check your plugin’s manual to learn about its MPE workflow. When MPE is activated in the plugin, 'Pressure' will be controlled by Osmose Initial Pressure axis and 'CC74 (MPE Timbre/Slide)' is controlled by Osmose's Aftertouch axis. For more details, see config menu.
In most MPE synths, the MPE note pitch bend range (Axe X) is set to +-48 semitones by default. By default, the per-note ‘bending range’ fraction on Osmose (Ext Midi mode > sensitivity menu > bending tab) is set to 1/48, so you will end up with a +/-1 semitone range for note bend gestures.
Integrating Osmose as an external instrument in Cubase
When you plan to record performances on your Osmose as MIDI messages inside your DAW and play them back into Osmose, use USB MIDI Port 2 (Haken port) of Osmose exclusively, see: Connect Osmose to your computer. On your PC, Port 2 will be called "MIDIIN2 Osmose" (or "MIDIOUT2 Osmose"). Take this into account for all the following instructions:
Select the suiting midi i/o settings on Osmose for integration into a DAW setup
Head to Osmose's midi i/o tab. Set 'usb haken mode' to "1/3 note only" to ensure Osmose sends MPE+ messages on Port 2. Set 'haken local control' to "off" to route your playing through your DAW before triggering the instrument. Attention: With 'haken local control' set to "off", Osmose will only sound when its track in your DAW is armed.
It's the classic workflow of listening to your performance ‘as recorded on tape’ instead of monitoring the source directly. It will make sure that your performance sounds identical during recording and playback.
Enabling MPE+ input from Osmose in your DAW
As mentioned before, newer versions of Cubase will automatically add two Note Expression Input Devices, one for each of Osmose's USB MIDI ports, to its Studio Setup whenever you connect Osmose to your computer. For working Osmose's internal sound engine, only the second USB MIDI port of Osmose is relevant (selected in the screenshot below):
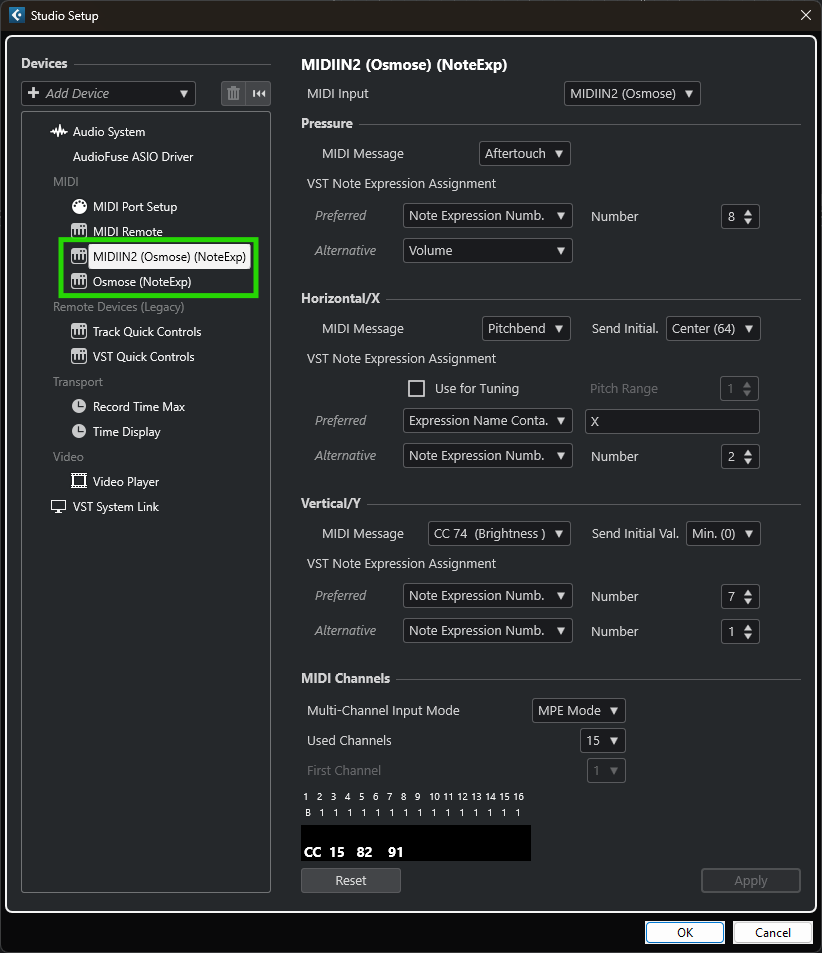
For older versions of Cubase, the Note Expression Device needs to be created manually by clicking on the + symbol. It has to be a Note Expression Input Device that is different from the one you use to control your plugins. For the newly created Note Expression Input Device, set "Osmose Port 2" as 'MIDI Input' and configure the device as shown in the screenshot further above.
Create Osmose as an external instrument in your DAW
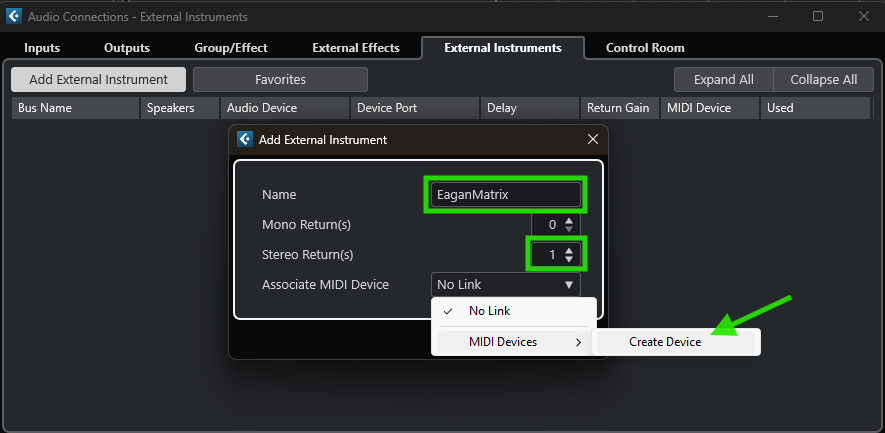
Go to Studio -> Audio Connections and open the 'External Instruments' tab. Click on 'Add External Instrument', enter a name (e.g. "EaganMatrix" or "Osmose"), be sure that a stereo return is set, and click on "No Link" next to "Associate MIDI Device" to choose "MIDI Devices" -> "Create Device".
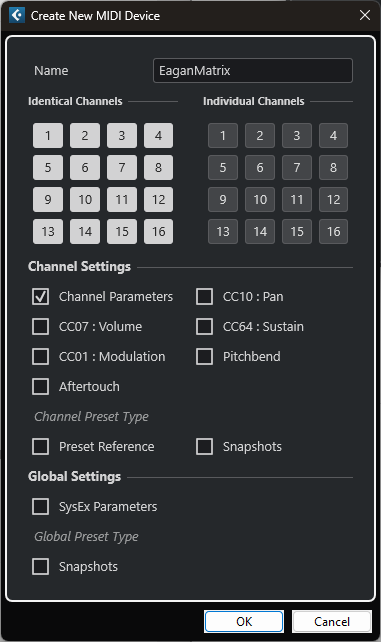
In the Create New MIDI Device panel, simply define a name like Osmose or EaganMatrix. The rest can be left at the default settings.
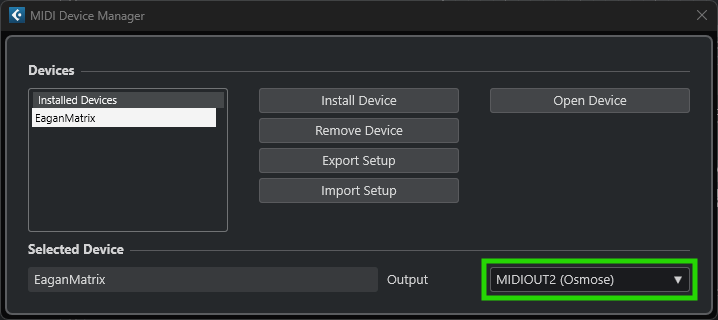
MIDI Device Manager will show after clicking OK. Select "Osmose Port 2" as Output for the MIDI device.
Once the 'External Instrument' and its link to the new Osmose MIDI Device is created, you can set the Device Port of its Return Bus so it matches the audio input of your audio interface that Osmose is hooked up to.

Creating an Osmose instrument track
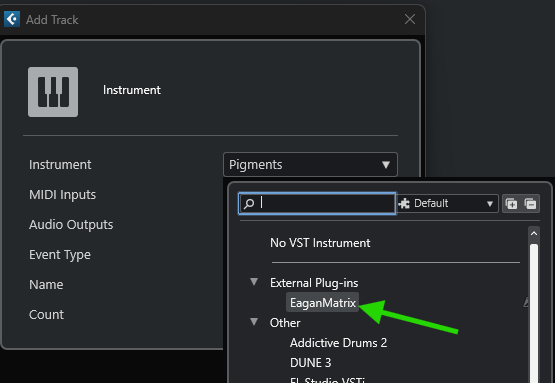
Create a new Instrument track: “Project” menu > “Add Track” > “Instrument”. As "Instrument", select the new external instrument that will now show up in the "External Plug-in" category:
In the Track Inspector, select the Note Expression Input Device that has "Osmose Port 2" chosen for its MIDI input. Set the MIDI channel selection to "Any". The Osmose / EaganMatrix MIDI device should already be selected for the output destination.
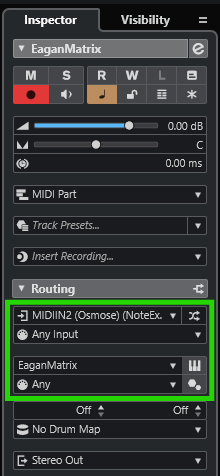
Further down in the Inspector, in the section 'Note Expression', activate 'Record MIDI as Note Exp.'
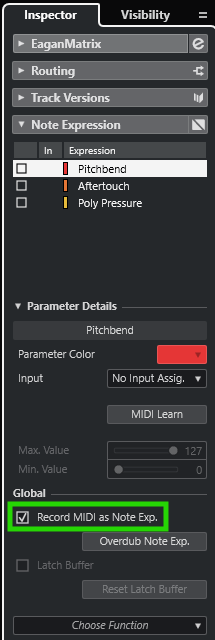
Arm the instrument track, and you are ready to record, edit, and playback Osmose performances in Cubase. Thanks to having created Osmose as an External Instrument in the Audio Connections, you will also see metering of the audio coming from Osmose directly in the track.
Attention: Cubase does not feature dynamic MIDI channel reallocation as per the MPE specification. Instead, it always keeps notes on the channel they have been recorded on. It means that overdubbing notes over an existing MIDI part or creating them manually with the pencil tool will likely cause sound glitches due to conflicts of voice allocation. To avoid this, you would need to manually ensure that no MPE note member channel (2 to 16) receives more than one note at a time by altering the channel of one of the notes that cause a conflict.


